
 Denne tutorialen er også lagt ut som artikkel på Kreativesider.no, ta en titt der for norsk forklaring.
Please feel free to link to my tutorial, but do not copy my work without permission. Thank you! If you have any questions, leave a comment or mail me at papirrommet@gmail.com.
I've used a piece of Bazzill carton, 12x12 inches.
 Score 15 cm. in towards the middle of your paper on both sides.
 That will give you about half a cm. in the middle, so when you fold your carton it looks like a book cover, for example.
 Next you turn your paper and score 14 cm into the middle, then you continue from the middle and score 14 cm. again. That will leave a flap on the end.
 This way you can fold your carton together like this, like a regular card.
 Now you will need a cirle punch or a circle and scalpell to cut out a half cirle on one of the ends. Do this on the end without the flap if you want it inside your card. I only did this on one side, but it's up to you if you want it on both.
 Now we can glue the card together. First, put glue on the middle like you see here. A little goes a long way;) Then you put glue on the outside of the flip and glue the card together like you see on the picture under here.

 And you're finished! You now have a card with two pockets ready to fill with what you want.
This is how the card looks like from the side, all folded. I'm thinking that a little hinge or something to close the card with would be perfect, I'm going to try that next time.

You can now decorate the card as you like, on the outside, inside and make somehing to put in both your pockets, tags, pictures or smaller cards. I also think this will work great as a minialbum if you make 2 or 3 of these and glue them together.
Hope you liked this tutorial, and just ask if you have any questions!;)
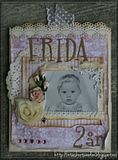
This is how I decorated my card, you can see the rest of it here.


.jpg)


.jpg)

.png)


8 kommentarer:
What beautiful Neeta,l love the papers and colours.
Hugs Riet.x
Så smart kort! Har laget en link på bloggen min, må prøve meg på denne senere:) Hvis jeg lager et slikt kort og legger det ut på bloggen min vil jeg henvise til deg, er det ok sånn? Kjempefint dekorert også, fine farger:)
Så utrolig lekkert kort, takk for at du deler:)
Gorgeous card Anita, such a great design and the papers and detail are beautiful. Hugs Nikki x
Heisann;-)
Det er så utrolig inspirerende å ta turen innom bloggen din;-) Og det er utrolig kjekt med slike flotte tutorials;-) Som takk for mye flott inspirasjon ligger der en liten ting til deg i bloggen min;-)
Ha en strålende kveld...
Merethe
Et nydeleg kort og fin tutorial.
Takk for flott bruksanvisning, tror jeg må prøve meg på dette en gang :)
this is gorgeous!!
xoxo BA
Legg inn en kommentar